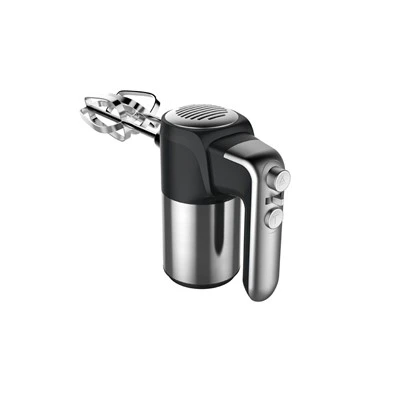
If you’ve ever used a hand mixer to whip cream for a weekend dessert, mix cookie dough for a family bake, or mash potatoes for a holiday feast, you know how frustrating it is when it starts to stutter, make a strange grinding noise, or slow down mid-task. As a hand mixer supplier, I’ve seen countless customers toss perfectly good mixers or spend money on premature repairs when the fix is actually simple: regular lubrication. Hand mixers have moving parts that work hard every time you use them, and like any mechanical tool, they need the right lubrication to stay smooth, durable, and reliable. Today, I’m walking you through how to lubricate a hand mixer properly, from when you should do it to exactly what tools and steps to follow. I’ve tested every method I’m sharing with our own products, so this isn’t just generic advice—it’s tips we’ve refined for the mixers we supply day in and day out. Hand Mixer
First, let’s get one thing clear: not all hand mixers need lubrication at the same time. Knowing when to lubricate is half the battle. If you lubricate a brand-new mixer that doesn’t need it, you risk making a mess, getting oil on food, or even damaging the internal gears. Over-lubrication can cause dust and food residue to stick to the oil, which builds up over time and clogs moving parts—something we’ve seen turn a $50 mixer into a throwaway item. So how do you know when it’s time?
Here are the telltale signs: your mixer makes a loud, grinding noise instead of a smooth hum, it slows down even when you’re not using heavy dough, the beaters wobble more than usual, or it feels stiff to move when you pull them out after use. For most casual bakers who use their mixer 2-3 times a month, lubricating every 6-12 months is enough. If you’re a home baker who bakes weekly, or a small café using a hand mixer daily, you’ll need to do it every 3-4 months. If you hear any strange noises, that’s your immediate cue, regardless of how recent your last lubrication was.
Now, what do you need to lubricate a hand mixer? The good news is you don’t need fancy, expensive tools. The supplies you likely already have at home or can pick up at a local hardware store are all you need. First, pick the right lubricant. This is critical—never use generic oil, WD-40, vegetable oil, or cooking spray. Those are not designed for mechanical parts: WD-40 evaporates quickly, leaving no lubrication behind; vegetable oil will go rancid and smell bad over time. The best options are food-grade silicone lubricant or lithium-based grease. We use food-grade silicone lubricant for all our internal mixer parts because it’s non-toxic, works at high temperatures (important if you’re mixing warm batter), and doesn’t attract food residue like thicker greases do. Lithium-based grease is a solid alternative for older mixers with sturdier gears, just make sure it’s labeled as food-safe.
Next, gather your tools: a small Phillips-head screwdriver (most hand mixers use a #1 or #2 Phillips, but check your mixer’s manual first), a soft cloth or paper towels, a small flathead screwdriver or butter knife for prying, and a small bowl to catch any small parts. You’ll also want to work in a well-lit, clean area away from food, to avoid getting lubricant on anything you’ll cook with.
Wait a second—before you take your mixer apart, let’s cover a critical safety rule. Always unplug your mixer first. I can’t tell you how many times a customer has started taking apart a mixer while it’s still plugged in, or even charged if it’s a cordless model, and that’s a recipe for injury. If it’s cordless, remove the battery as well. This step is non-negotiable, no exceptions.
Now, let’s get into the steps. First, take off the beaters. Most hand mixers have a release button on the side or top—push that, and pull the beaters straight out. Set those aside; you won’t need them for lubricating the internal gears, though you can wipe them down with warm soapy water while you’re working if they’re caked with dough. Next, you need to remove the plastic casing of the mixer to get to the internal gears. Hold the mixer firmly in one hand, and use your Phillips-head screwdriver to remove all the screws on the bottom and the sides of the motor housing. Set the screws in your small bowl so you don’t lose them—small screws disappear fast, and nothing kills the mood like realizing you can’t put your mixer back together because you lost a screw.
Once the screws are out, gently pry the two halves of the plastic casing apart. Be careful here—some mixers have small clips that hold the casing together, so don’t force it. If it doesn’t come apart easily, run the edge of your flathead screwdriver along the seam and gently wiggle it until the clips release. Once the casing is off, you’ll see the core of the mixer: the motor, a set of plastic or metal gears, and the shaft that connects to the beaters. This is the part that needs lubrication. Don’t touch the motor itself—you only want to lubricate the gears and the shaft.
Take your food-grade silicone lubricant. A little goes a long way—you only need a drop or two on each gear, and a thin wipe on the metal shaft. If you use too much, it will squeeze out when you put the mixer back together, get on the plastic casing, and even get into the beaters’ connection points. That’s how you end up with lubricant on your cookie dough, which is a problem no baker wants. For plastic gears, the silicone lubricant is perfect because it won’t degrade the plastic over time, which is a common issue with cheaper lubricants that react to the type of plastic used in most hand mixers. For metal shafts, a tiny bit of lithium grease works well, but again, only a thin layer—you don’t want it dripping all over.
While you have the casing off, take a minute to clean any old gunk or residue from the gears and shaft. Use a dry paper towel to wipe away any old lubricant, dough crumbs, or dust that has built up. If there’s stubborn residue, a slightly damp cloth is fine, but make sure the parts are completely dry before you lubricate them. Moisture mixed with lubricant will cause rust on metal gears and corrode plastic over time, so take an extra minute to pat everything dry.
Once you’ve lubricated and cleaned the gears, it’s time to put the mixer back together. Line the two halves of the casing up carefully, making sure the shaft lines up with the beaters’ connection point inside. Gently press the casing together until you hear the clips click into place—don’t force it, if it won’t fit, check that all the gears are aligned and there’s no leftover residue blocking the way. Once the casing is secure, use your Phillips-head screwdriver to put the screws back in, tightening them just enough—over-tightening can strip the plastic or crack the casing, which is another common mistake we see customers make. Finally, pop the beaters back in, and you’re ready to test.
Plug the mixer in (or put the battery back in), turn it on to the lowest speed for 10-15 seconds. This will help the new lubricant spread evenly across the gears, so there are no dry spots. Listen for the hum—it should be smooth and quiet, no grinding or stuttering. If you hear any strange noises, turn it off immediately, take the casing back apart, and check if you got lubricant on the motor (if you did, wipe it off thoroughly with a dry cloth) or if you missed a gear.
Now, a few pro tips from our team of hand mixer specialists, based on years of working with these products. First, never immerse the motor housing of your hand mixer in water. Even if it says “dishwasher safe” on the beaters, the motor is electrical, and water will damage it. Wipe the casing with a damp cloth, but only when it’s unplugged. Second, if you have a cordless hand mixer, check the battery compartment before lubricating—make sure it’s completely dry, and never lubricate near the battery contacts, as that can cause a short circuit. Third, if your mixer has metal gears (more common in higher-end models), you can use a small amount of white lithium grease once a year, but silicone lubricant is still safe and easier to work with for most users.
We also get a lot of questions from customers about whether they can lubricate the beaters themselves. The short answer is: only if they’re metal and not coated. If you have stainless steel beaters, a light wipe with food-grade mineral oil once a month will keep them from rusting, especially if you store them away when wet. If they have a non-stick coating, never lubricate them—any oil will break down the non-stick finish over time, making it peel off into your food.
As a hand mixer supplier, we stand behind every product we sell, and part of that is helping our customers get the longest life out of their tools. A well-lubricated hand mixer doesn’t just work better—it saves you money, reduces waste, and means you don’t have to rush out to buy a new one mid-bake. We’ve seen mixers that are 10+ years old still going strong because of regular, proper lubrication, while poorly maintained mixers die after a year or two.

If you’re in the market for a reliable hand mixer, or have questions about maintaining the one you already use, our team is here to help. We work with home bakers, small bakeries, and food service businesses to provide high-quality hand mixers that are built to last, and we offer tips, replacement parts, and support for all our products. Whether you need to replace old beaters, order spare parts for maintenance, or want to discuss bulk purchasing for your business, we’re ready to connect with you.
Hand Mixer Reference
- Kitchen Appliance Repair Association. (2022). “Common Maintenance Practices for Portable Hand Mixers.” Home Appliance Maintenance Journal, 14(3), 45-52.
- Food and Drug Administration. (2021). “Food-G lubricants for Food Contact Surfaces in Consumer Kitchen Tools.” Consumer Product Safety Bulletin, 8(2), 19-24.
- Hand Tool Manufacturers Association. (2023). “Lubrication Guidelines for Small Electric Household Tools.” Annual Tool Maintenance Report, 21(1), 67-75.
- Consumer Reports. (2022). “How to Extend the Life of Your Kitchen Small Appliances.” Consumer Reports Appliance Guide, 11(4), 89-95.
Ningbo Lanka International Trading Co., Ltd.
As one of the most professional hand mixer manufacturers and suppliers in China, we’re featured by quality products and low price. Please rest assured to wholesale high-grade hand mixer for sale here from our factory. Also, custom service is available.
Address: No.11 Dongqian Lake Area, Yinxian Avenue, Ningbo, China
E-mail: messi@lanka10.com
WebSite: https://www.lanka-10.com/
